Kasparov-Short Exhibition Match in St Louis
Kasparov wins 8.5-1.5
By IM Max Illingworth
Hello to the Tasmanian chess community and any other readers! I am International Master Max Illingworth, a qualified FIDE Trainer and the current Australian Champion, with a live FIDE rating over 2500 and two Grandmaster norms. I’ll be writing posts for this site on a sporadic basis and I hope you enjoy the content I provide! If you like my writing style, please check out my website www.illingworthchess.com where you can find more of my blog posts/articles and information about my chess coaching services. Now on to the news story!
Some of you may have heard of the Kasparov-Short exhibition match that took place recently in St Louis, as part of the launch for the new ‘2015 International Chess Circuit’ – namely the Norway Chess, Sinquefield Cup and London Chess Classic super-tournaments – offering a combined $1,000,000+ in prize money. One could compare this to the ‘Grand Slam’ in tennis.
As for the match itself, it consisted of two rapid and eight blitz games, with one rapid and four blitz games played on each day. Kasparov took the early lead with 3.5-1.5 (his only loss being on time from a somewhat better position when he forgot about the clock), but on the second day Short was whitewashed 5-0 to make the final score 8.5-1.5. Short attributed the result to problems adjusting to a completely different time zone (he had just flown back from the 2015 Thailand Open, which he won on tiebreak from Surya Shekhar Ganguly and Kamil Dragun), while Kasparov pointed to his resolve to go right for the attack in nearly every game on the second day.
Let’s now look at a couple of blitz games from the match showing this dynamic play, to illustrate the huge practical value of having the initiative and an attack on the opponent’s king in blitz.
Short,Nigel D (2664) - Kasparov,Garry (2812) [A01]
Legends Blitz Match 2015 Saint Louis USA (3), 25.04.2015
[Illingworth, Max]
The Nimzo-Larsen Attack is used by many strong players as a blitz weapon, though Black's response in the game is pretty good at neutralising it.
1.b3 Nf6 2.Bb2 g6 3.g3
3.Bxf6 exf6 4.c4 d5 5.cxd5 Qxd5 6.Nc3 Qa5 gives Black the bishop pair in return for the worse pawn structure.
3...Bg7 4.Bg2 d5 5.Nf3 c5 6.0–0 0–0 7.e3 Nc6
Funnily enough, Black scores better in this position than White does in the same position with reversed colours and White to move!
8.Ne5
White is opting for a very hyper-modern strategy, hoping to exert pressure on Black's centre with his bishops (and a quick c4 break to open the long diagonal for the g2–bishop).
8...Bd7
8...Nxe5 9.Bxe5 Bg4 10.Qe1 Qd7 was another way to develop.
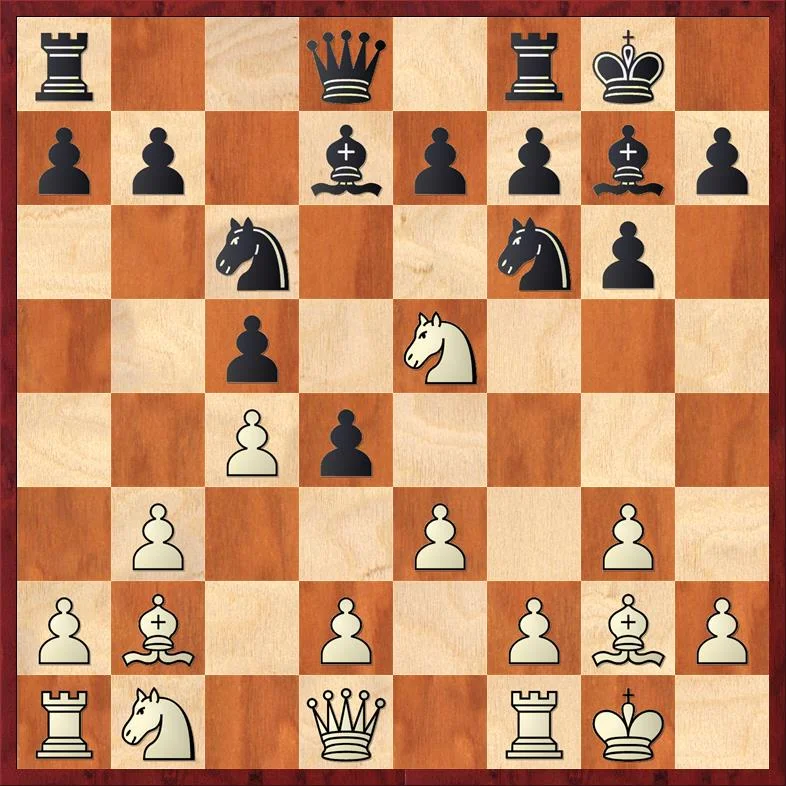
Position after 9. ... d4!?
9.c4
I would be more drawn to claiming the bishop pair advantage with 9.Nxd7 Qxd7 10.d3 followed by Nd2, with a quirky but flexible Hippo setup. White will generally follow with either c4 to open the long diagonal for his light-squared bishop or e4 to reach a King's Indian structure with the powerful unopposed king's bishop.
9...d4!? (diagram right)
A typically dynamic approach by Kasparov, accepting some positional disadvantages to keep White's queenside pieces out of the game.
10.Nxc6
10.exd4 was probably better, intending 10...cxd4 (10...Nxd4 11.Bxd4 cxd4 12.Bxb7 wins a pawn.) 11.Nxd7 Nxd7 12.d3 with a good version of a Fianchetto Benoni because the g2–bishop is unchallenged, and White has a fairly easy plan of steadily expanding on the queenside (though an f4 break could also work in some positions). 12...Nc5 13.Ba3 Qb6 14.Bxc5 Qxc5 15.Nd2 is a bit better for White - in such opposite-coloured bishop middlegames, having the better bishop is key to determining who has the advantage.
10...Bxc6 11.Bxc6 bxc6
Black's position is already easier to play because of his space advantage. True, the c5–pawn is weak, but how does White get at it?
12.d3
Not 12.Ba3? dxe3 13.fxe3 Ne4; 12.exd4 cxd4 13.d3 undoubles Black's pawns but may have been the best try to avoid the arising tactical problems with defending d3 and e3.
12...Qd7
12...dxe3! 13.fxe3 Qd7 was a more precise move order, to not give White time to take on d4 or close the position with e4.
13.Qe2
13.e4 was called for, when White can still hope for kingside play with a quick f4 (of course, when Black can't respond ...Ng4–e3).
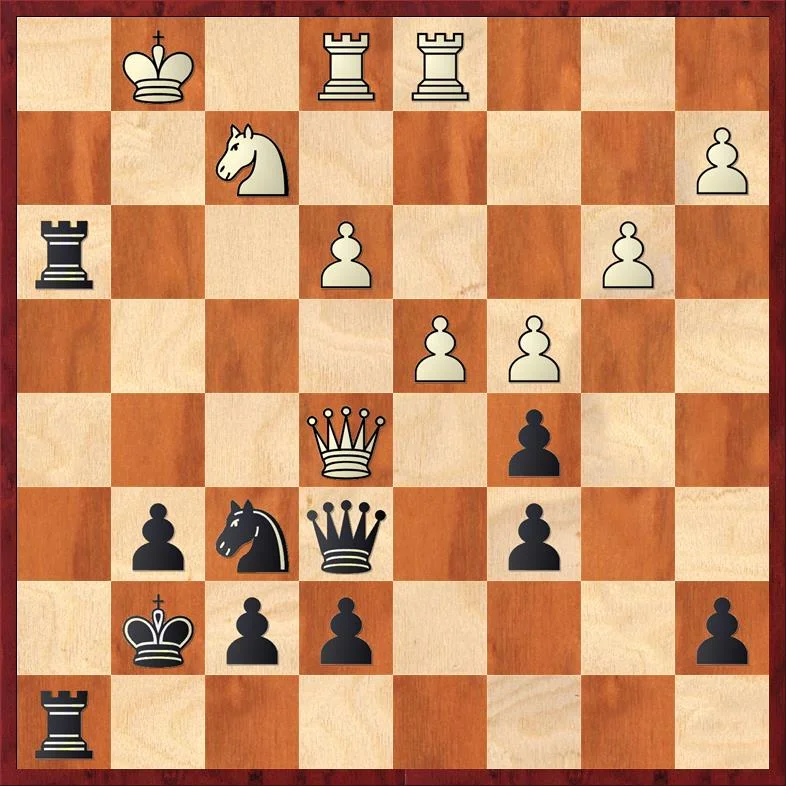
Position after 14. fxe3
13...dxe3 14.fxe3 (diagram left)
14.Qxe3 Qh3! threatens the unpleasant ...Ng4, and if 15.Qe2 Ng4 16.f3 Nxh2! 17.Bxg7 Nxf1 18.Bxf8 Nxg3 19.Qg2 Qh4 trapping the bishop is a lovely tactical sequence too. 20.Bxe7 Qd4+ 21.Qf2 Qxa1–+
14...Rad8 15.Rd1
Else the d-pawn is lost.
15.d4 Ng4 is also very unpleasant for White as he'll lose the e3–pawn if he takes on c5.
15...h5
A dynamic continuation, playing to remove the pawn shelter around White's king with ... h4 (we'll see just how significant this is later!)
15...Qg4 however was also possible, with the point that after 16.Qxg4 (16.Nc3 Qxe2 17.Nxe2 Ng4; 16.Kf1 Qe6 17.Nd2 Ng4 18.Bxg7 Kxg7 19.Ne4 Qe5 20.Qxg4 f5) 16...Nxg4 17.Bxg7 Kxg7 White is unable to keep e3 and d3 defended, and if 18.e4 Ne5 picks up d3.
16.Nc3 Ng4
With this move Black threatens ...Nxe3! followed by ...Bd4, so White's options are limited.
17.Na4
17.Kg2 Bh6 18.Bc1 Qe6 19.Ne4 Qe5 20.Rb1 f5 shows how White's defences can be overloaded.
17...Bxb2 18.Nxb2 Qe6 19.Re1
19.Rd2 was a better defence, with the idea that 19...Qxe3+ 20.Qxe3 Nxe3 only temporarily wins a pawn because of 21.Re1 Nf5 22.Na4 , but this isn't the sort of continuation one is likely to play in blitz.
Position after 19. ... h4!
19...h4! (diagram right)
A superb idea, intending to use the h-file as a route of attack with ...Kg7 and ...Rh8.
20.gxh4
20.Kg2 hxg3 21.hxg3 Kg7 22.e4 Rh8 23.Rh1 Ne5 is clearly better for Black - White is tied up defending both his king and the weak pawn on d3. Black can later increase the pressure with a well-timed ...f5 break.; 20.Qg2 hxg3 21.Qxg3 Kg7 was perhaps the best defence, but Black's attacking plan of ...Rh8 and doubling on the h-file is still very easy to implement and White faces an extremely tough defence.
20...Kg7 21.Qg2
21.h3 was the only way to continue the fight, but after 21...Nf6 the h4–pawn will soon be lost and then h3 will also be a big weakness. Black's position almost plays itself here: 22.Qf3 Rh8 23.Qg3 Rh7 24.Kg2 Rdh8 25.Rh1 Rxh4 and so forth.
21...Rh8 22.Qg3 Rh5
Not bad, but Black had an immediate win with 22...g5! 23.Re2 Rxh4 24.Rf1 Rdh8 and there's no defence to threats like taking on h2 or even ...Rh3.
23.h3 Ne5 24.Rad1 Rdh8 25.d4
hort makes a bid for counterplay, but Kasparov keeps control.
25...Nd7 26.Nd3 Rxh4 27.Nf2
27.Nf4 Qf5 28.Rf1 was perhaps the last chance to keep the position together, though 28...Nf6 intending ...Ne4 is a strong answer.
Position after 28. Rxh3
27...Nf6 28.Qe5 Rxh3 (diagram left)
Black goes for the clearly better endgame.
28...Qc8! actually leaves White without a good defence to the threat of ...Rxh3, though again it's not a typical move for the time control. 29.dxc5 Rxh3 30.Nxh3 Qxh3 31.Kf2 Rh5 and White is getting mated or losing the queen. Note that ...Ng4 was illegal!
29.Qxe6
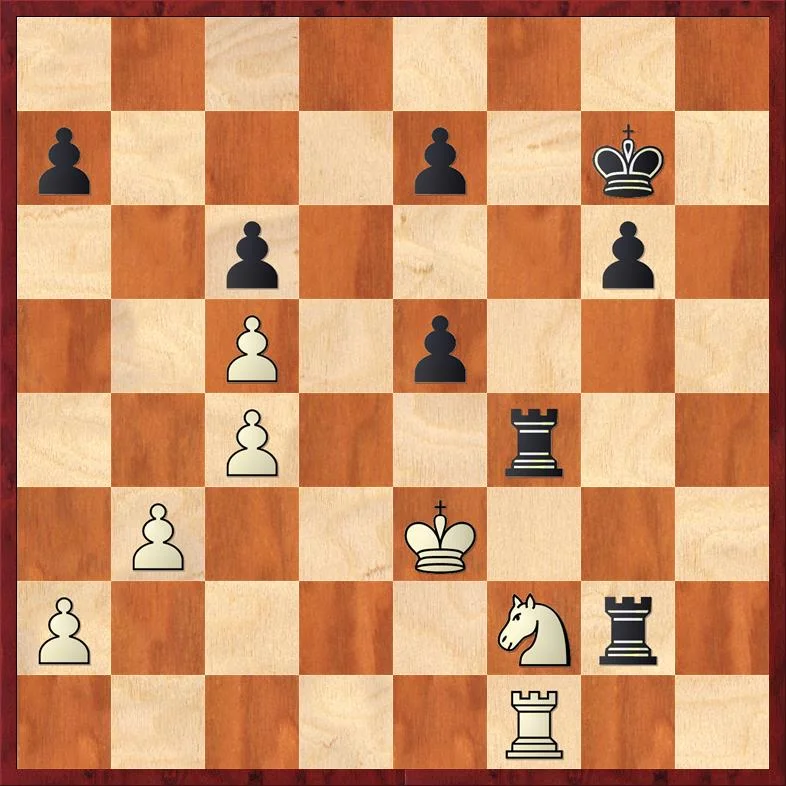
Final position.
Immediately losing was 29.Nxh3 Qxh3 30.Kf2 (...Qf3! and Rh1 mate was the threat) 30...Rh5
29...Rg3+ 30.Kf1 fxe6 31.Ke2 Rh2 32.Rh1 Rhg2 33.Rdf1
33.Kf1 was a better defence, but even here 33...Ng4 34.Nxg4 Rxg4 should be winning for Black as his rooks are far too active and White's king is weak.
33...Ng4
Now it's completely over for White.
34.Rh4 Rxe3+ 35.Kd2 Re4 36.Rxg4 Rexg4 37.dxc5 Rf4 38.Ke3 e5
0–1
We can already appreciate from this game a useful truth about fast time controls: it is much easier to attack than defend with little time on the clock. That’s why it’s a good idea to choose active play over passivity given the choice, when you are in time pressure. As another example of this, I present to you one of the blitz games from the second day of the match.
Kasparov,Garry (2812) - Short,Nigel D (2664) [C00]
Legends Blitz Match 2015 Saint Louis USA (7), 26.04.2015
[Illingworth, Max]
Position after 20. Qc2
1.e4 e6 2.d3 d5 3.Nd2 b6 4.Ngf3 Nf6 5.c3 c5 6.Be2 Be7 7.0–0 a5 8.Re1 0–0 9.e5 Nfd7 10.Nf1 Nc6 11.d4 Ba6 12.Bxa6 Rxa6 13.Qd3 c4 14.Qc2 b5 15.Ne3 b4 16.Ng4 a4 17.a3 bxc3 18.bxc3 Rb6 19.Qxa4 Qa8 20.Qc2 (diagram right)
At this point Black would be doing quite well if he continued his queenside play, but he opted to insert an arguably weakening move on the kingside.
20...h5?!
20...Rfb8 followed by ...Na5–b3 would be the natural way to proceed, but Black must have feared something on the kingside. I'm not sure what as 21.h4 Na5 22.Ng5 Nf8 holds everything together on the kingside.
21.Ne3 Rfb8 22.g4!
Completely in the spirit of the position and Kasparov's style - and the attack is very hard to defend against.
22...hxg4 23.Nxg4 R8b7?
Black wants to bring his queen over to the defence, but this is simply too slow.
23...Qa5! 24.Kh1 Rb3 was the correct defence, although after 25.Bd2 (25.Nh6+ gxh6 26.Bxh6 Qxc3 27.Rg1+ Kh8 28.Bg7+ Kg8 29.Bh6+ is an immediate draw if White wants it. In general, when deciding on whether to go all out for an attack (say, with a sacrifice), it's much easier to play for the attack when you can see the worst-case scenario is a draw.) 25...Rb2 26.Qd1 Kf8 27.Rg1 and the position is quite complicated, but White's king is currently the safer of the two and that makes his position easier to play.
Position after 24. ... Na5
24.Kh1 Na5 (diagram left)
And now Black is lost, though to be fair the position was extremely hard to defend in such a situation.
24...Kh8 25.Rg1 Qg8 is perhaps the best defence, but you almost need to be a computer to consider this and after 26.Nh6 Qe8 27.Rg3 the White attack shows no sign of slowing down. 27...Nf8 28.Rh3!? (28.Ng4) 28...gxh6 29.Bxh6 Ng6 30.Rg1 Kg8 31.Ng5
25.Rg1
25.Nh6+! gxh6 26.Bxh6 Kh8 27.Rg1 threatening Rg7 or Bg7 was even faster.
25...Qe8 26.Bg5
White simply brings more pieces into the attack, and Black is unable to defend as his pieces are mostly on the other side of the board, and the space advantage the e5–pawn offers prevents the pieces from returning to the kingside. 26.Bh6 g6 (26...Nb3 27.Bxg7) 27.Bg5 Nb3 28.Ra2
26...Rb2 27.Qc1 Kf8
Trying to make a getaway, but the queen is in the way!
28.Qf4
28.Bh6 intending Bxg7 was equally decisive.
28...Qd8
Final position
28...Bxg5 29.Qxg5 threatens Nf6! and there's no great defence for Black; if 29...Qe7 30.Nf6! anyway.
29.Bh6! Re2
29...gxh6 30.Nxh6 threatens mate on f7 and g8.
30.Bxg7+ Ke8 31.Nh6
The entire kingside collapses and the rest is short work.
31...Nb6 32.Qxf7+ Kd7 33.Ng5 Kc8 34.Qxe6+ Kb8 35.Ngf7 Qc7 36.Nf5 Rxf2 37.N7d6 Bxd6 38.Nxd6 Qxg7 39.Rxg7 Rxg7 40.Rg1
1–0
Thanks for reading and I’ll be back with another post in the future!


