Wesley So (2788) - Samuel Sevian (2531) [D46]
US Championships Saint Louis USA (3), 03.04.2015
The battle of Young vs. Younger!
1.Nf3 d5 2.d4 Nf6 3.c4 e6 4.Nc3 c6 5.e3 Nbd7 6.Qc2 Bd6
Sam shows he's not afraid to enter the sharpest lines against the world's best.
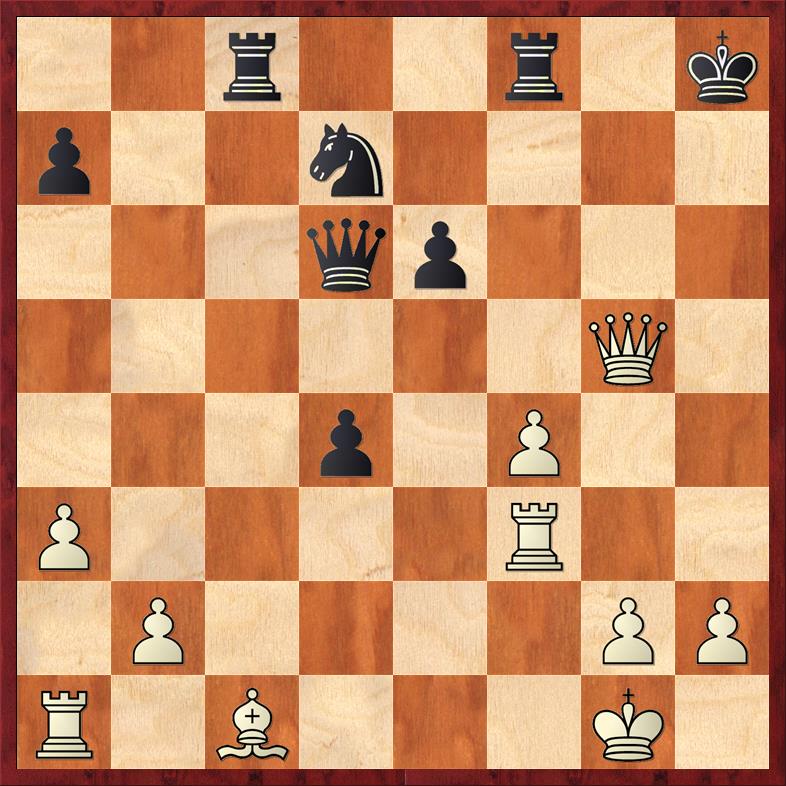
Position after 12. Ng5
7.Bd3 0–0 8.0–0 dxc4 9.Bxc4 b5 10.Bd3 Bb7 11.a3 Rc8 12.Ng5 (Diagram Right)
An ambitious move, famously used by Aronian in his spectacular loss to Anand. There is no doubt that both players are aware of this game.
12.b4 was the main line, but it has been shown that Black can in fact play 12. ... c5! anyway.
12...c5
Sevian plays Anand's move. Usually a safe bet.
13.Bxh7+
13.Nxh7 as played by Aronian was punished spectacularly by Anand. 13...Ng4 14.f4 cxd4 15.exd4 Bc5!! 16.Be2 Nde5! 17.Bxg4 Bxd4+ 18.Kh1 Nxg4 19.Nxf8 f5 20.Ng6 Qf6 21.h3 Qxg6 22.Qe2 Qh5 23.Qd3 Be3 0–1 (23) Aronian,L (2802)-Anand,V (2772) Wijk aan Zee 2013 CBM 153 [Anand, V]
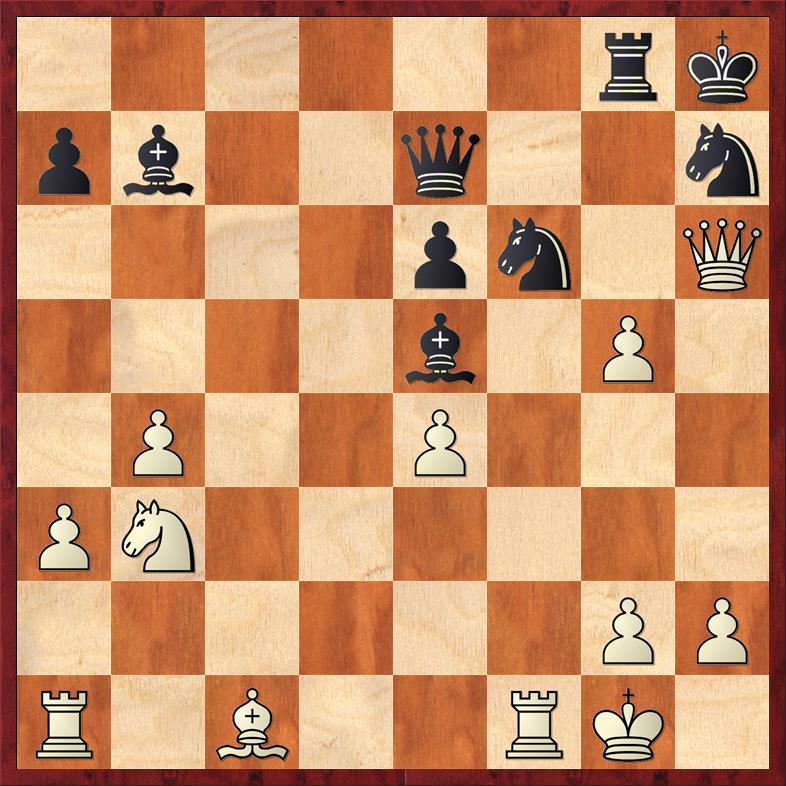
Position after 16. Qe7
13...Kh8 14.f4 g6 15.Bxg6 fxg6 16.Nxb5
Thus far Sam has used far more time than Wesley, and here he slips up.
16...Qe7? (Diagram Left)
16...Bb8 first was necessary, and Qe7 next move.
17.Qxg6?
Wesley lets him off the hook. More accurate was 17.Nxd6 first, drawing the queen to away from the 7th rank, and not allowing the bishops retreat. 17...Qxd6 18.Qxg6 is monstrous for White, with e4–Rf3–Rh3 nearly impossible to stop.
Position after sideline 22. Qxg5
18...cxd4
a) 18...Qe7 19.Bd2 Nh7 20.dxc5 Nxg5 21.fxg5;
b) 18...Rce8 19.Bd2 Re7 20.Bc3 Rg7 21.dxc5 (21.Qh6+ Kg8 22.dxc5 Qxc5 23.Qxg7+ Kxg7 24.Nxe6+) 21...Rxg6 22.cxd6;
19.e4 Bxe4 20.Nxe4 Nxe4 21.Rf3 Ng5 22.Qxg5 (Diagram Right)
17...Bb8
Now we are back in less clear territory, with both players on their own.
18.dxc5 Rxc5
18...Nxc5 was a viable alternative, after which I still like 19.Bd2
19.Nd4 Rg8
19...Nh7 is slightly better, as there is no reason to provoke the queen to h6.
20.Qh6+ Nh7 21.e4
21.h4 I like this move better, mainly cause it ensures the g-file will stay closed
21...Ndf6
21...Bxf4! 22.Bxf4 Rcxg5 23.Bxg5 Qxg5 24.Qxg5 Nxg5 With excellent drawing chances for black.
22.b4 Rcxg5!
Sam correctly sacrifices the exchange.
23.fxg5
Note how if Wesley played h4 this sac would be far less annoying.
23...Be5
23...Ng4 24.Bb2 e5 (24...Nxh6? 25.Nf5+ e5 26.Nxe7 Rxg5 27.Rad1+–) 25.Nf5 Qxg5 26.Qxg5 Nxg5
24.Bb2
I'd give this a question mark, but it's hard to assign them to such natural moves in a crazy position.
Position after sideline 24. Nb3
24.Nb3! (Diagram Left)
This was actually much stronger, keeping g5 securing and inviting Black to grab on a1, which would weaken his dark squares. 24...Bxe4 (24...Bxa1 25.Nxa1 can hardly be recommended, given the king on h8 on the open diagonal.) 25.Ra2 Ng4 26.Qh5 Bxh2+ 27.Kh1 and Black's king is far looser than White's.
24...Ng4 25.Qh5?
A logical move to hold onto the material, but it gives black counter chances. 25.Qh3 immediately was necessary, and while the situation is still far from clear, White is still the one on top. 25...Rxg5 26.Rac1 With 3 pawns for the piece on top of the activity and initiative.
25...Qxg5
25...Rxg5 26.Rf7 would not be recommended for Black, and perhaps was So was hoping for.
26.Qh3
White understandably doesn't want to exchange queens, but he doesn't really have a choice, and this is better than the alternative. 26.Qxg5 Nxg5 and Black's pieces are just massive.
26...Qe3+
Position after sideline 26. ... Qd2
While black is better after the exchange of queens, black missed the opportunity to go on the offensive with the more aggressive Qd2, and the forcing line that follows. 26...Qd2 (Diagram Right) 27.Qc3 Qh6 28.Qg3 Qh5 (28...Bxg3? 29.Nf5+ e5 30.Nxh6 Bxh2+ 31.Kh1 Nxh6 32.Kxh2 With drawing chances for both sides.) 29.Qh3 Qxh3 30.gxh3 Nxh2+ 31.Kf2 Nxf1 32.Rxf1 Bxe4 with a win comfortable win for black.
27.Qxe3 Nxe3 (Diagram Below)
White is materially ahead, has the extra rook against 2 minor pieces, and more pawns - but is positionally lost.
Position after 27. ... Nxe3
28.Rf2
Not the best defence, but White's position was hopeless anyway.
28...Ng5!
With pieces like this, White's prospects are slim. Sam doesn't let him off the hook from here.
29.Kh1 Nc4
29...Nxe4! was immediately over, with the idea that 30.Re2, the only move to save the rook fails to 30...Rxg2! forcing mate 31.Nf3 is the best and computer like defence, but it cannot save the game.
a) 31.Rxg2 the natural capture is no good. 31...Nf2+ 32.Kg1 Nh3+ 33.Kh1 Bxg2#;
b) blocking the bishop via the c6 square fails in much the same way as Nf3. 31.Nc6 Bxc6 32.Bxe5+ Kh7 33.b5 Bd5 with mate on all lines. 34.Rxg2 (34.Rd1 Rxe2 35.Rxd5 (35.a4 Ng3+ 36.Kg1 Rg2#) 35...Re1#) 34...Nf2+ 35.Kg1 Nh3+ 36.Kh1 Bxg2#;
31...Rxe2 32.Bxe5+ Kh7 33.h4 Nd2 all moves lose to the mating net. 34.-- Bxf3+ 35.Kg1 Rg2+ 36.Kh1 Rg3+ 37.Kh2 Ndf1+ 38.Rxf1 Nxf1#
30.Bc3 Nxe4 31.Rf7
31.Rf3! was one last trick, with the idea that on 31...Nxc3 32.Rh3+ Kg7 33.Rxc3 d4 shouldn't be taken due to 33...Bxd4? (33...Kf6! is still winning.) 34.Rg3+ Kh7 35.Rh3+ Kg7 36.Rg3+ with a draw, and if 36...Kf7 37.Rf1+ Black is even worse.
Position after 32. ... Bxd4
31...Nxc3 32.Rxb7 Bxd4 (Diagram Right)
Black's clump of pieces dominate the board.
33.Rf1 Rg7 34.Rb8+ Kh7 35.g3 e5 36.Rff8 Ne3 37.h4 Ne4 38.Rh8+ Kg6 39.h5+ Kg5 40.h6
The pawn is getting far, but White's king is in far too much danger.
40...Rf7 41.h7??
Final Game Position after 41. ... Rf1
the decisive blunder, though white is lost anyway.
41...Rf1+ 0-1 (Diagram Below)
there is no defence to the attack, and with mate coming soon, white resigned. Wesley will definitely be disappointed with his missed chances this game, but Sam out-calculated his elite opponent from a difficult position.
Position after continuation 47. ... Ng3#
42.Kh2 Ng4+ 43.Kh3 Rh1+ 44.Kg2 Rh2+ 45.Kf1 Ne3+ 46.Kg1 Rg2+ 47.Kh1 Nxg3# (Diagram Below)


